Have a wonderful Holiday and Happy New Year. See you in 2016!
The Goddess
SPARKLING CANDY SHOE
A sparkling, creative container for your favorite Holiday treats…whether it’s candy canes, fudge, caramels, popcorn, chocolate bark, toffee or peppermint, this unusual paper, pointed toe shoe becomes a festive vessel for Christmas confections. It can also be used as a tree ornament, party favor, hostess gift or part of a holiday tablescape.
[box type=”download”]
Materials Needed:
Scrapbook paper (four different designs)
White glue
Scissors
Decorative edge scissor
Glitter glue
Wire ribbon Rhinestone button or earring Rhinestones
[/box]
Here’s How:
Draw a pattern for a shoe: sole; front top; and back
Cut two soles and backs, one front top
Glue two backs to each other for stability
Cut back and front top about 1/2″ larger and cut ends into tabs, fold tabs over, glue them underneath sole
Using decorative edge scissor, cut top edge of back and inside edge of front top
Glue ends of ribbon underneath sole and tie a bow
Glue rhinestone button or earring to bow knot, rhinestones to toe
Glitter decorative edges on top back, front top and toe
Glue second sole to bottom of sole
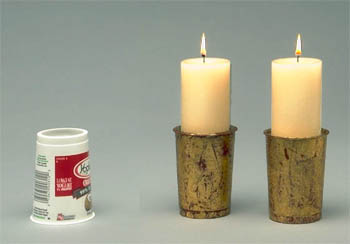
CANDLELIGHT SPLENDOR!
Light up the holidays with these elegant gold leaf candlesticks. Great for the holiday dinner table or placed strategically around the home. Great for a last minute decoration that is easy and quick!
[box type=”download”]
Materials Needed:
Yoplait® yogurt containers
White glue
Paintbrush
Gold Leaf Kit: follow directions
Brass cap flush pull
2″ diameter candle
[/box]
Here’s how:
Turn Yoplait® container upside down.
Follow directions on gold foil crackle (gold leafing) kit** (available in art and paint stores).
Work step by step.
After completely dry, glue brass cap flush pull inside inverted top.
Place candle in slot and light!
** Directions for gold leafing:
- Seal porous surfaces such as plaster, wood, paper mache, etc. with one coat of sealer.
- Basecoat object and let dry. Use two coats for richer-colored cracks.
- Apply a heavy, even coat of adhesive. Let dry about one hour or until clear and tacky. Hint: for a more even crackle, apply the two thin coats of adhesive in an opposite or crosswise direction.
- With the shiny side up, apply Foil to object. Press and rub onto the surface with your fingers or use a rubber brayer. Use a pencil eraser, dulled broken toothpick, or similar tool to push the foil firmly into any hard-to-reach areas. Peel the foil off, leaving the metallic finish on the surface. For best crackling results, thoroughly cover the entire surface with Foil finish. Let dry at least one hour.
- Apply a heavy coat of Foil Crackle Medium with a soft bristle brush (do not use a foam brush). Avoid over brushing. As it dries, cracks will appear and the basecoat will show through the cracks. It will dry in about an hour, though drying time will vary due to temperature and humidity. For deeper cracks, apply a second coat of Crackle Medium after first coat has dried.
- When completely dry (about 24 hours), apply a coat of sealer for a protective finish.