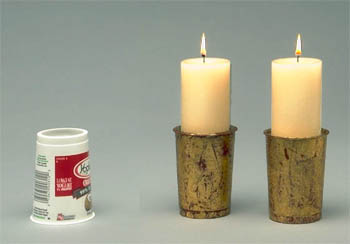
Jack jumped over the candlestick; Jill danced around hers; You can shine with yours!
Grace your home with a pair of elegant gold leaf candlesticks suitable for any memorable occasion.
MATERIALS NEEDED
- Yoplait® yogurt containers
- White glue
- Paintbrush
- Gold Leaf Kit: follow directions
- Brass cap flush pull
- 2″ diameter candle
HERE’S HOW
- Turn Yoplait® container upside down
- Follow directions on gold foil crackle (gold leafing) kit** (available in art and paint stores)
- Work step by step
- After completely dry, glue brass cap flush pull inside inverted top
- Place candle in slot and light!
** Directions for gold leafing:
- Seal porous surfaces such as plaster, wood, paper mache, etc. with one coat of sealer.
- Basecoat object and let dry. Use two coats for richer-colored cracks.
- Apply a heavy, even coat of adhesive. Let dry about one hour or until clear and tacky. Hint: for a more even crackle, apply the two thin coats of adhesive in an opposite or crosswise direction.
- With the shiny side up, apply Foil to object. Press and rub onto the surface with your fingers or use a rubber brayer. Use a pencil eraser, dulled broken toothpick, or similar tool to push the foil firmly into any hard-to-reach areas. Peel the foil off, leaving the metallic finish on the surface. For best crackling results, thoroughly cover the entire surface with Foil finish. Let dry at least one hour.
- Apply a heavy coat of Foil Crackle Medium with a soft bristle brush (do not use a foam brush). Avoid overbrushing. As it dries, cracks will appear and the basecoat will show through the cracks. It will dry in about an hour, though drying time will vary due to temperature and humidity. For deeper cracks, apply a second coat of Crackle Medium after first coat has dried.
- When completely dry (about 24 hours), apply a coat of sealer for a protective finish.